")

")
")
Tạo Service Account cho Terraform chứng thực GCP (Google Cloud Platform) – Cuongquach.com | Trước khi chúng ta có thể sử dụng Terraform để cấu hình/định nghĩa /quản lý các hạ tầng trên Google Cloud Platform (GCP) thì chúng ta cần có thông tin Service Account với các quyền hạn cụ thể để chứng thực tương tác với GCP Project và GCP Resource. Trong bài viết này sẽ hướng dẫn bạn tạo Service Account trên GCP.
Contents
1. Tạo Service Account trên GCP cho Terraform
Chúng ta sẽ tạo một Service Account với các quyền hạn về Organization và Project. Việc phân quyền cụ thể thì các bạn có thể linh động theo từng nhu cầu quản lý của team.
Trong bài này mình giả định bạn đã có :
- Organization
- Project
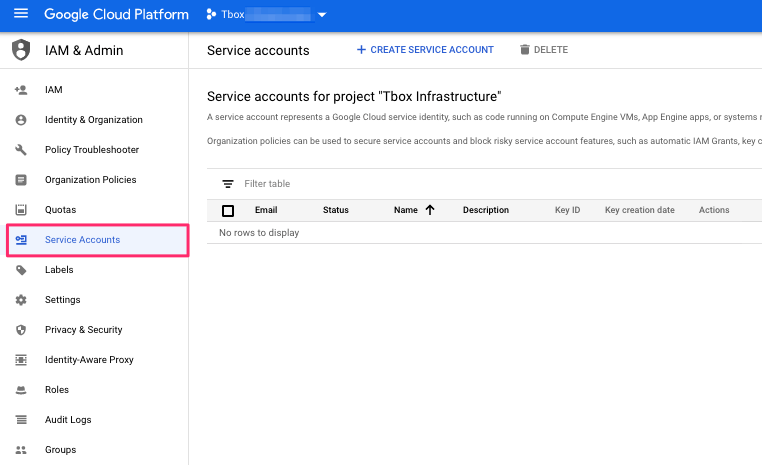
Bạn click vào “IAM & Admin” > Service Account.
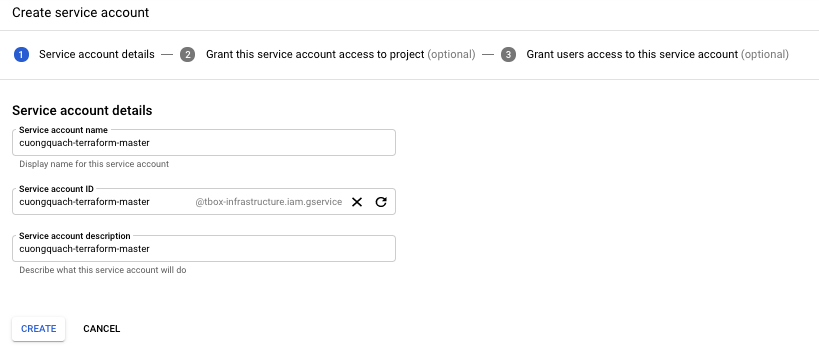
Chọn “Create Service Account“, điền tên Service Account.
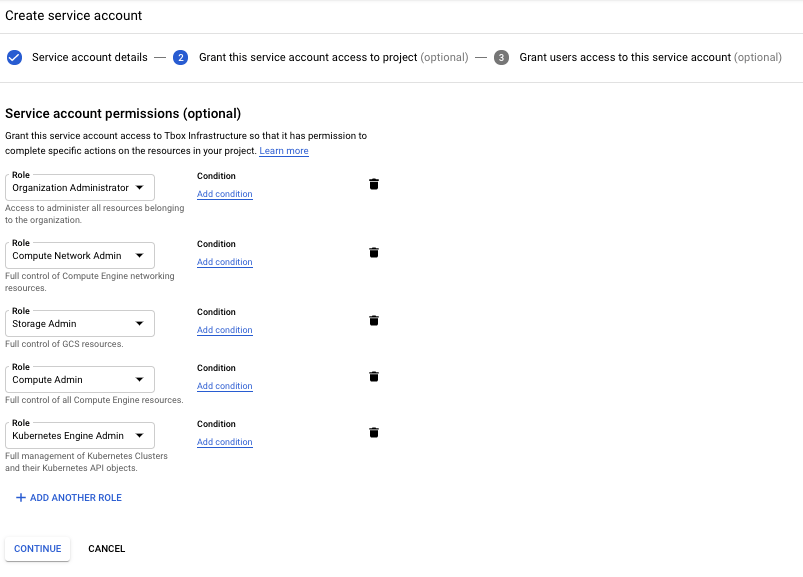
Kế đến là phần phân quyền :
- Organization Administrator
- Storage Admin: full quyền với dịch vụ Google Cloud Storage
- Compute Admin: full quyền với dịch vụ Compute Engine
- Kubernetes Engine Admin: full quyền quản lý dịch vụ Kubernetes Cluster
- Compute Network Admin: full quyền quản lý dịch vụ Networking
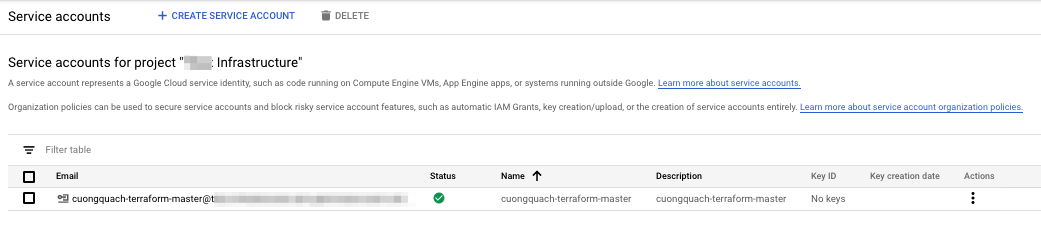
Sau khi “DONE” bạn sẽ có thông tin Service Account ở trang quản lý .
Bạn bấm vào tài khoản Service Account vừa khởi tạo, để tạo một key mới giúp cung cấp thông tin về tài khoản chứng thực GCP cho terraform.
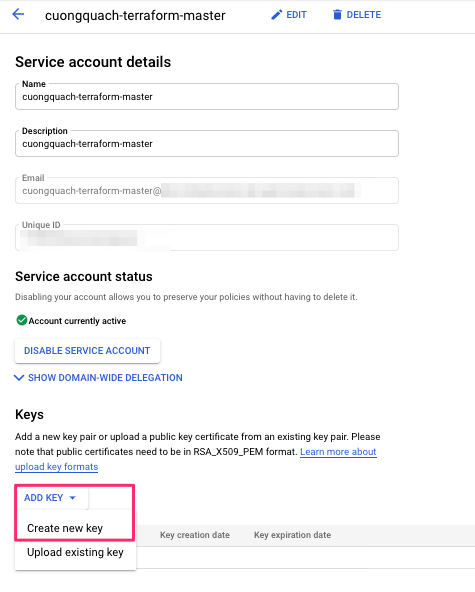
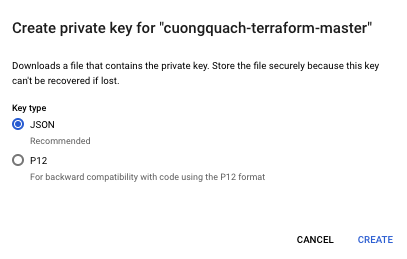
Chọn định dạng file json.
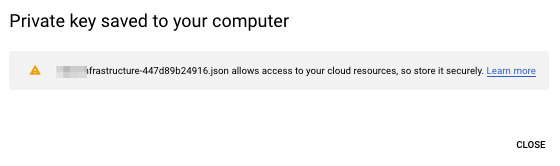
Sau đấy lưu thông tin file JSON Service Account xuống máy tính của bạn.
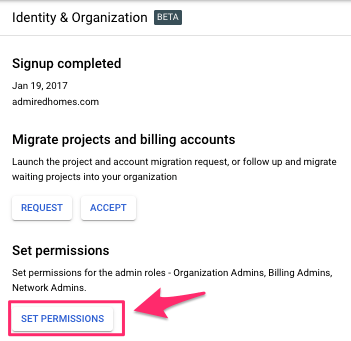
2. Phân quyền trên Organization (phụ)
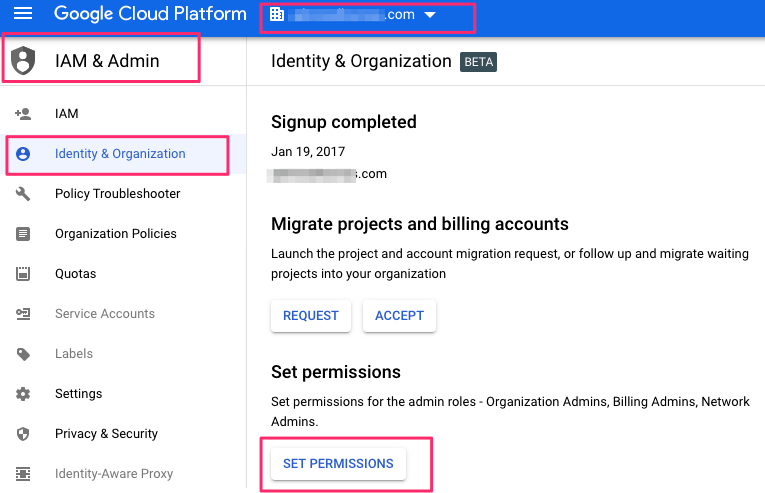
Đây là phần phụ, nếu bạn muốn tài khoản Service Account Terraform có quyền khởi tạo các Project mới, thì cần thêm quyền hạn đối với Organization Google Cloud.
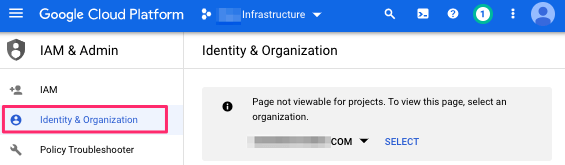
Bấm vào : Organization > Identity & Organization > IAM & Admin > SET PERMISSIONS
Chọn “ADD”.
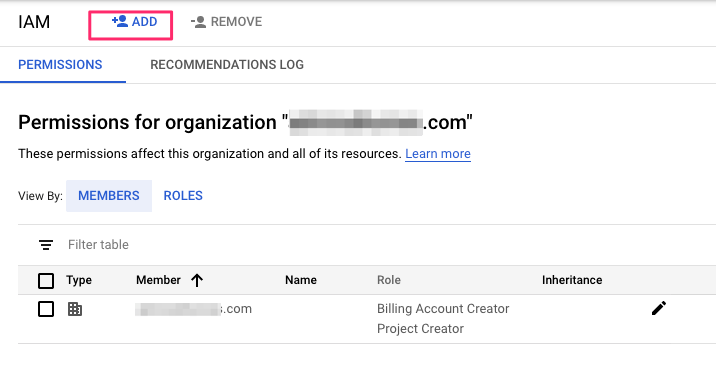
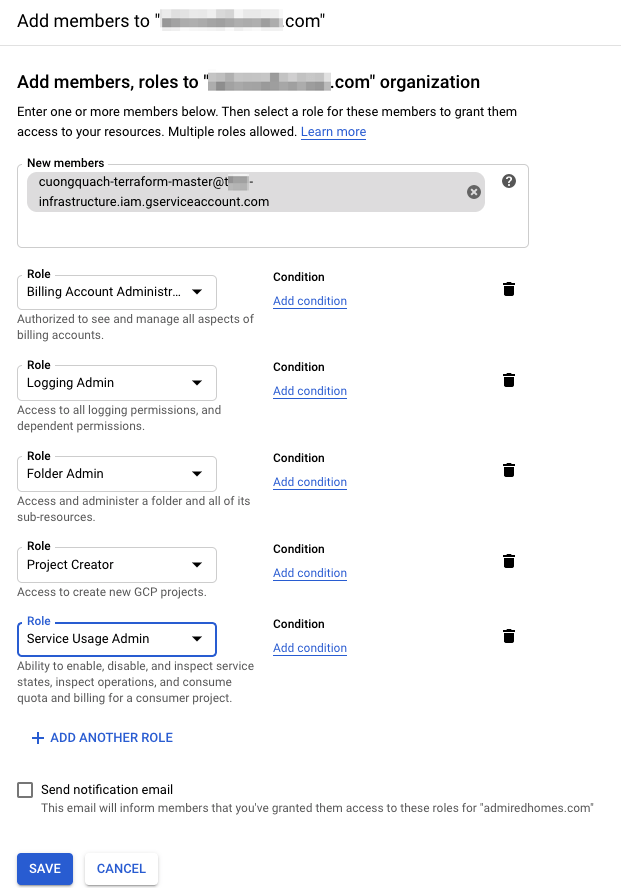
Thêm thông tin Service Account đã tạo trước đó và thêm các quyền hạn role như sau (các bạn có thể tuỳ chỉnh theo yêu cầu quản trị) :
- Folder Admin
- Billing Account Administrator
- Service Usage Admin
- Project Creator
- Logging Admin
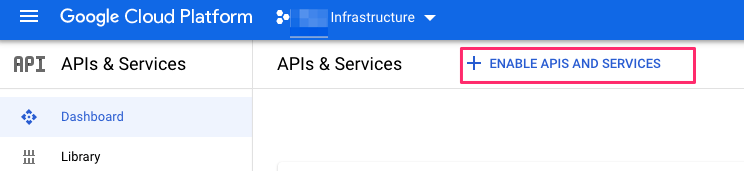
3. Kích hoạt các GCP API cần thiết
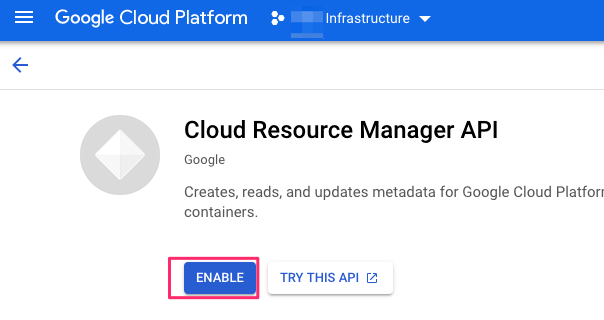
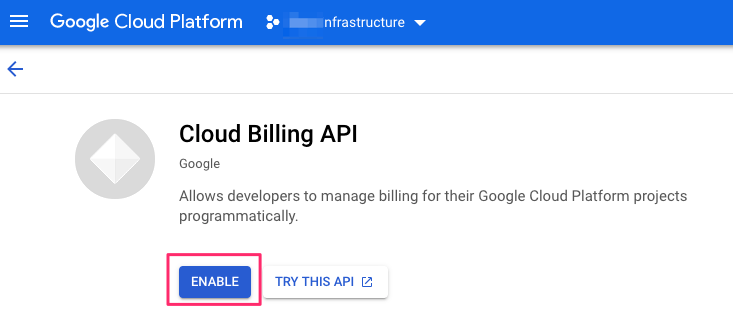
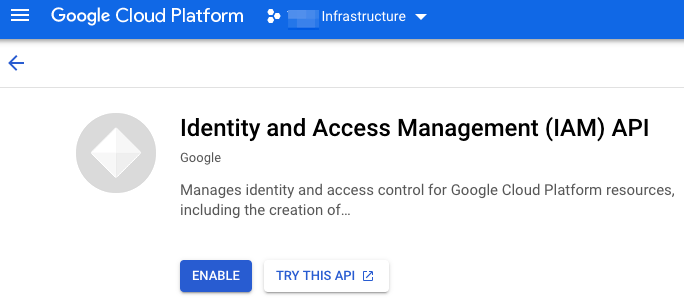
Bạn cần kích hoạt các API sau cho Terraform sử dụng trên Project mà bạn quản lý hạ tầng:
+ Cloud Resource Manager API
+ Cloud Billing API
+ Identity and Access Management API
+ Compute Engine API
4. Cấu hình Terraform provider GCP
Giờ thì ta sẽ cấu hình Terraform với provider gcp (Terraform Provider GCP) xem có nhận thông tin Service Account đã khởi tạo chưa nhé. Từ đó Terraform sẽ có các quyền hạn tương ứng Service Account để quản lý hạ tầng GCP.
Ta tạo thử 1 VPC GCP mặc định nhé, ở bước 1 thì ta đã thêm quyền hạn về “Compute Networking” cho Service Account rồi.
File service-account.json, lúc nãy bạn download rồi thì để cùng cấp với thư mục cấu hình Terraform nhé.
# mkdir demo-provider-gcp-tf
# cd demo-provider-gcp-tf
# ls
main.tf              service-account.json
# vi main.tf
provider "google" {
  credentials = file("${path.module}/service-account.json")
  project     = "cuongquach-nfrastructure"
  region      = "asia-southeast1"
}

resource "google_compute_network" "vpc_network" {
  name = "vpc-network"
}
Giờ terraform init và terraform plan để test thử nào.
# terraform init

Initializing the backend...

Initializing provider plugins...
- Checking for available provider plugins...
- Downloading plugin for provider "google" (hashicorp/google) 3.33.0...

The following providers do not have any version constraints in configuration,
so the latest version was installed.

To prevent automatic upgrades to new major versions that may contain breaking
changes, it is recommended to add version = "..." constraints to the
corresponding provider blocks in configuration, with the constraint strings
suggested below.

* provider.google: version = "~> 3.33"

Terraform has been successfully initialized!

You may now begin working with Terraform. Try running "terraform plan" to see
any changes that are required for your infrastructure. All Terraform commands
should now work.

If you ever set or change modules or backend configuration for Terraform,
rerun this command to reinitialize your working directory. If you forget, other
commands will detect it and remind you to do so if necessary.
# terraform plan
Refreshing Terraform state in-memory prior to plan...
The refreshed state will be used to calculate this plan, but will not be
persisted to local or remote state storage.


------------------------------------------------------------------------

An execution plan has been generated and is shown below.
Resource actions are indicated with the following symbols:
  + create

Terraform will perform the following actions:

  # google_compute_network.vpc_network will be created
  + resource "google_compute_network" "vpc_network" {
      + auto_create_subnetworks         = true
      + delete_default_routes_on_create = false
      + gateway_ipv4                    = (known after apply)
      + id                              = (known after apply)
      + ipv4_range                      = (known after apply)
      + name                            = "vpc-network"
      + project                         = (known after apply)
      + routing_mode                    = (known after apply)
      + self_link                       = (known after apply)
    }

Plan: 1 to add, 0 to change, 0 to destroy.

------------------------------------------------------------------------

Note: You didn't specify an "-out" parameter to save this plan, so Terraform
can't guarantee that exactly these actions will be performed if
"terraform apply" is subsequently run.
Chạy terraform apply để khởi tạo thử 1 VPC Network mặc định nào.
# terraform apply

An execution plan has been generated and is shown below.
Resource actions are indicated with the following symbols:
  + create

Terraform will perform the following actions:

  # google_compute_network.vpc_network will be created
  + resource "google_compute_network" "vpc_network" {
      + auto_create_subnetworks         = true
      + delete_default_routes_on_create = false
      + gateway_ipv4                    = (known after apply)
      + id                              = (known after apply)
      + ipv4_range                      = (known after apply)
      + name                            = "vpc-network"
      + project                         = (known after apply)
      + routing_mode                    = (known after apply)
      + self_link                       = (known after apply)
    }

Plan: 1 to add, 0 to change, 0 to destroy.

Do you want to perform these actions?
  Terraform will perform the actions described above.
  Only 'yes' will be accepted to approve.

  Enter a value: yes

google_compute_network.vpc_network: Creating...
google_compute_network.vpc_network: Still creating... [10s elapsed]
google_compute_network.vpc_network: Still creating... [20s elapsed]
google_compute_network.vpc_network: Still creating... [30s elapsed]
google_compute_network.vpc_network: Still creating... [40s elapsed]
google_compute_network.vpc_network: Still creating... [50s elapsed]
google_compute_network.vpc_network: Creation complete after 55s [id=projects/cuongquach-infrastructure/global/networks/vpc-network]

Apply complete! Resources: 1 added, 0 changed, 0 destroyed.
Vậy là bạn đã biết cách để tạo tài khoản Service Account giúp cho Terraform của bạn có thể chứng thực GCP và tương tác khởi tạo/quản lý hạ tầng trên GCP rồi đấy.
Nguồn: https://cuongquach.com/

")
")
")
")

")
")

")


")