")

")
")
Hướng dẫn cài đặt Consul Agent ở Client Mode – Cuongquach.com | Ở bài viết trước chúng ta đã tìm hiểu cách thức xây dựng một hệ thống Cluster Consul phục vụ cho hoạt động Service Discovery. Xong bước xây dựng ở Consul Server, thì chúng ta phải dịch chuyển xuống phía Consul Client (tức là ở các máy chủ dịch vụ client) để cài đặt Consul Agent và cấu hình vào chung cụm Cluster Consul dưới quyền client.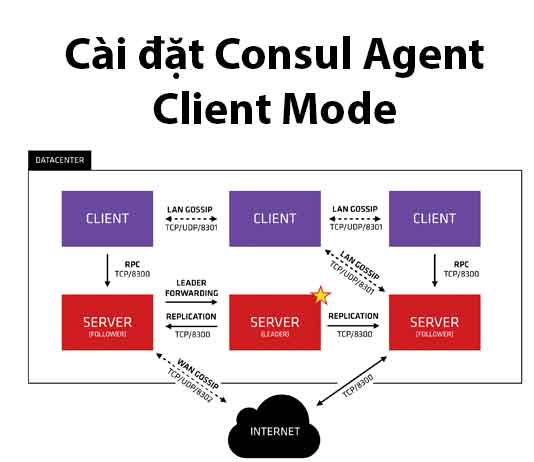
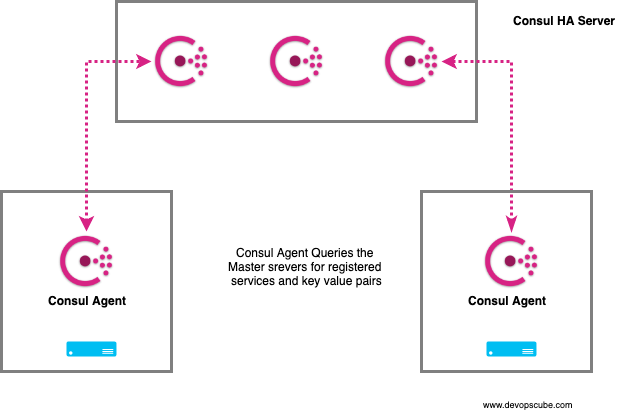
Consul Cluster Server và Consul Client
Chúng ta sẽ review nhanh phát lại mô hình cơ bản với Consul sẽ gồm 2 thành phần :
- Cụm Consul Cluster Server : tức Consul Agent được chạy ở mode server.
- Consul Agent Client : tức Consul Agent được chạy ở mode client dưới các máy chủ dịch vụ cần tham gia vào hoạt động Service Discovery.
Cài đặt Consul Agent ở Client Mode
Giả sử máy chủ client của mình có hostname dành cho dịch vụ NTP chẳng hạn nhé.
# hostname
node-ntp-01
Bạn cần cài một số gói tiên quyết để giải nén chương trình binary Consul.
+ CentOS/RHEL
# yum install unzip -y
+ Ubuntu/Debian
# apt-get install unzip -y
Giờ bạn truy cập trang tải phần mềm ‘consul‘ để lấy link download : https://www.consul.io/downloads.html
# cd /opt/
# wget --no-check-certificate -O consul.zip https://releases.hashicorp.com/consul/1.5.3/consul_1.5.3_linux_amd64.zip
Bung nóc giải nén và di chuyển binary đến thư mục $PATH môi trường nào.
# unzip consul.zip
# mv consul /usr/bin/
# chmod +x /usr/bin/consul
Kiểm tra xem consul binary hoạt động chưa nhé.
# consul
Usage: consul [--version] [--help] <command> [<args>]

Available commands are:
acl Interact with Consul's ACLs
agent Runs a Consul agent
catalog Interact with the catalog
config Interact with Consul's Centralized Configurations
connect Interact with Consul Connect
debug Records a debugging archive for operators
event Fire a new event
exec Executes a command on Consul nodes
force-leave Forces a member of the cluster to enter the "left" state
info Provides debugging information for operators.
intention Interact with Connect service intentions
join Tell Consul agent to join cluster
keygen Generates a new encryption key
keyring Manages gossip layer encryption keys
kv Interact with the key-value store
leave Gracefully leaves the Consul cluster and shuts down
lock Execute a command holding a lock
login Login to Consul using an auth method
logout Destroy a Consul token created with login
maint Controls node or service maintenance mode
members Lists the members of a Consul cluster
monitor Stream logs from a Consul agent
operator Provides cluster-level tools for Consul operators
reload Triggers the agent to reload configuration files
rtt Estimates network round trip time between nodes
services Interact with services
snapshot Saves, restores and inspects snapshots of Consul server state
tls Builtin helpers for creating CAs and certificates
validate Validate config files/directories
version Prints the Consul version
watch Watch for changes in Consul
Khởi tạo thư mục cho dịch vụ ‘consul‘ ở mode client.
# mkdir -p /etc/consul.d/client/
# mkdir -p /var/lib/consul/
Tạo user/group chạy dịch vụ consul client.
# groupadd consul
# useradd -g consul -s /sbin/nologin --no-create-home consul
# chown consul: -R /var/lib/consul/
Tạo file cấu hình ‘consul’ với thông tin cần lưu ý sẽ được đề cập ở phần dưới.
# vi /etc/consul.d/client/config.json
{
    "server": false,
    "datacenter": "cuongqc-consul",
    "domain": "cuongquachlab.com",
    "data_dir": "/var/lib/consul/",
    "encrypt": "JLhmGJlwxZKtOLv4h6t26w==",
    "log_level": "INFO",
    "enable_syslog": true,
    "leave_on_terminate": true,
    "start_join": [
        "consul-01.cuongquachlab.com",
        "consul-02.cuongquachlab.com",
        "consul-03.cuongquachlab.com"
    ]
}
Cấu hình lưu ý:
- server : chúng ta sử dụng consul ở mode client, không sử dụng mode server.
- datacenter : khai báo thông tin datacenter khớp với data center trên Cluster Consul Server.
- data_dir : thư mục chứa data hoạt động của dịch vụ Consul Client.
- domain : hỗ trợ phân giải tên miền ở ngay cả localhost Consul Agent Client. Tên miền này nên khớp với tên miền đã cấu hình ở Consul Cluster trước đó khi triển khai. Nếu không muốn hỗ trợ DNS Consul ở Client thì bỏ phần config này cũng được.
- encrypt : chuỗi key dùng để mã hoá trao đổi thông tin giữa Consul Client và Consul Server. Chuỗi key này lấy ở phần cấu hình Consul Cluster.
- log_level : mức độ log.
- enable_syslog : kích hoạt ghi log ở chế độ syslog.
- leave_on_terminate : nếu kích hoạt thì khi agent nhận được tín hiệu TERM, sẽ gửi thông điệp ‘Leave’ rời khỏi cụm cluster.
- start_join : danh sách các máy chủ Consul Server mà Consul Client cần kết nối.
Tạo file khởi chạy dịch vụ consul client.
# vi /etc/systemd/system/consul-client.service
[Unit]
Description=Consul Service Discovery Agent - Client Mode
Documentation=https://www.consul.io/
Requires=network-online.target
After=network-online.target

[Service]
Type=simple
User=consul
Group=consul
ExecStart=/usr/bin/consul agent -config-dir=/etc/consul.d/client
ExecReload=/usr/bin/consul reload
TimeoutStartSec=0
Restart=on-failure
SyslogIdentifier=consul
KillMode=process
LimitNOFILE=65536

[Install]
WantedBy=default.target
Cho load lại dịch vụ system daemon.
# systemctl daemon-reload
Khởi động dịch vụ consul client mode nào.
# systemctl start consul-client
# systemctl enable consul-client
# systemctl status consul-client
Bạn cần mở port rule firewall giữa Consul Server Cluster và Consul Agent Client, danh sách port gồm :
– TCP 8300, 8301, 8302, 8400, 8500, 8600
– UDP 8301, 8302, 8600
# iptables -A INPUT -p tcp --match multiport --dports 8300, 8301, 8302, 8400, 8500, 8600 -j ACCEPT
# iptables -A INPUT -p udp --match multiport --dports 8301, 8302, 8600 -j ACCEPT
Kiểm tra xem Consul Client của chúng ta đã thêm vào được Cluster Consul chưa nhé.
# consul members
Node Address Status Type Build Protocol DC Segment
node-consul-01 10.0.253.181:8301 alive server 1.5.2 2 cuongqc-consul <all>
node-consul-02 10.0.253.35:8301 alive server 1.5.2 2 cuongqc-consul <all>
node-consul-03 10.0.253.84:8301 alive server 1.5.2 2 cuongqc-consul <all>
node-ntp-01 10.0.253.20:8301 alive client 1.5.3 2 cuongqc-consul <default>
Bạn kiểm tra sẽ thấy máy chủ node ‘node-ntp-01‘ sẽ ở trạng thái client chung với cụm Consul Cluster config DataCenter mà bạn cấu hình.
Vậy là bạn đã biết cách cấu hình Consul Agent ở Client Mode phía dưới các máy chủ dịch vụ client sẽ tham gia vào hoạt động Service Discovery thông qua dịch vụ Consul rồi đấy. Ở bài viết kế tiếp chúng ta sẽ tìm hiểu cách khai báo đăng ký dịch vụ cần giám sát với Consul.
Nguồn: https://cuongquach.com/
 trên Consul")


 – Firebrand Training")
 – Lương Ánh Hoàng – Download PDF")
")