")

")
")
Hướng dẫn cài đặt dịch vụ Vault trên Linux – Cuongquach.com | Bạn đang tìm giải pháp có thể lưu trữ các thông tin bảo mật như mật khẩu, access key/secret key,.. mà ứng dụng đó phải có khả năng tích hợp với các dịch vụ Cloud/OpenSource/Solution khác. Nếu vậy thì bạn không nên bỏ qua cơ hội trải nghiệm một giải pháp mang tên VAULT.
Contents
Vault là gì ?
Trang chủ: https://www.vaultproject.io/
Vault là một công cụ của công ty HashiCorp với mục tiêu lưu trữ và truy xuất các thông tin bảo mật. Các thông tin dữ liệu bảo mật mà Vault phục vụ bao gồm: api key, mật khẩu, thông tin dưới dạng key-value, chứng chỉ,…
Vault cung cấp các hình thức, kênh truy xuất dữ liệu này thông qua API, GUI, command line,… Bên cạnh đó còn có các cơ chế mã hoá dữ liệu lưu trữ và các cơ chế ACL quản lý quyền hạn khả năng truy xuất của người dùng.
Như vậy Vault được thiết kế chạy như 1 dịch vụ độc lập để lưu trữ các thông tin nhạy cảm, phục vụ tích hợp cho các ứng dụng/dịch vụ/cloud khác sử dụng. Một số dịch vụ tương ứng như AWS KM, HSM, Keywhiz,.. để bạn tham khảo.
Chúng ta sẽ không tìm hiểu nhiều về dịch vụ Vault trong bài viết này. Mà sẽ có một bài viết giới thiệu khác.
1. Cài đặt chương trình Vault trên Linux
Vault cung cấp cho chúng ta một package Vault binary để chạy luôn không cần phải tiến hành biên dịch hay cài đặt từ các repo, điều này vô cùng tiện lợi và cũng là đặc trưng của các sản phẩm công ty HarshiCorp.
Link download: https://releases.hashicorp.com/vault/
# cd /opt/
# wget --no-check-certificate https://releases.hashicorp.com/vault/1.1.5/vault_1.1.5_linux_amd64.zip
Giải nén gói zip ra và di chuyển chương trình Vault binary vào thư mục ‘/usr/bin/‘, nằm trong biến $PATH môi trường.
# unzip vault_1.1.5_linux_amd64.zip -d .
# mv vault /usr/bin/
# chmod +x /usr/bin/vault
Chạy cú pháp lệnh sau để Vault thực hiện các cấu hình cần thiết như autocompletion.
# vault -autocomplete-install
# complete -C /usr/bin/vault vault
Cấu hình cho Vault sử dụng tính năng ‘mlock syscall‘, mlock syscall sẽ ngăn một số tác vụ từ bộ nhớ bị swap xuống ổ cứng.
# setcap cap_ipc_lock=+ep /usr/bin/vault
Kiểm tra xem binary Vault chạy ok chưa nào.
# vault -h
Usage: vault <command> [args]

Common commands:
    read        Read data and retrieves secrets
    write       Write data, configuration, and secrets
    delete      Delete secrets and configuration
    list        List data or secrets
    login       Authenticate locally
    agent       Start a Vault agent
    server      Start a Vault server
    status      Print seal and HA status
    unwrap      Unwrap a wrapped secret

Other commands:
    audit          Interact with audit devices
    auth           Interact with auth methods
    kv             Interact with Vault's Key-Value storage
    lease          Interact with leases
    namespace      Interact with namespaces
    operator       Perform operator-specific tasks
    path-help      Retrieve API help for paths
    plugin         Interact with Vault plugins and catalog
    policy         Interact with policies
    print          Prints runtime configurations
    secrets        Interact with secrets engines
    ssh            Initiate an SSH session
    token          Interact with tokens
Kế đến ta tạo thông tin user hệ thống để chạy dịch vụ Vault. Rồi tạo thư mục chứa data cho Vault, chúng ta dùng cơ chế storage cơ bản là local filesystem.
# useradd --system --home /etc/vault/ --shell /bin/false vault
# mkdir -p /etc/vault/
# mkdir -p /var/lib/vault/
# chown vault:vault -R /var/lib/vault/ /etc/vault/
Khởi tạo file khởi động dịch vụ trên systemd (CentOS 7/RHEL 7/Ubuntu 16.04)
# vi /etc/systemd/system/vault.service
[Unit]
Description="HashiCorp Vault - A tool for managing secrets"
Documentation=https://www.vaultproject.io/docs/
Requires=network-online.target
After=network-online.target
ConditionFileNotEmpty=/etc/vault/config.json

[Service]
User=vault
Group=vault
ProtectSystem=full
ProtectHome=read-only
PrivateTmp=yes
PrivateDevices=yes
SecureBits=keep-caps
AmbientCapabilities=CAP_IPC_LOCK
Capabilities=CAP_IPC_LOCK+ep
CapabilityBoundingSet=CAP_SYSLOG CAP_IPC_LOCK
NoNewPrivileges=yes
ExecStart=/usr/bin/vault server -config=/etc/vault/config.json
ExecReload=/bin/kill --signal HUP $MAINPID
KillMode=process
KillSignal=SIGINT
Restart=on-failure
RestartSec=5
TimeoutStopSec=30
StartLimitIntervalSec=60
StartLimitBurst=3
LimitNOFILE=65536

[Install]
WantedBy=multi-user.target
Vault hỗ trợ 2 định dạng cấu hình cho bạn là JSON và HCL, để dễ tiếp cận phần cấu hình, mình lựa chọn định dạng JSON để cấu hình dịch vụ Vault. Bạn có thể tham khảo các chú thích cấu hình Vault tại đây: https://www.vaultproject.io/docs/configuration/
# vi /etc/vault/config.json
{
  "listener": [
    {
      "tcp": {
        "address": "0.0.0.0:8200",
        "tls_disable": 1
      }
    }
  ],
  "api_addr": "http://0.0.0.0:8200",
  "storage": {
    "file": {
      "path": "/var/lib/vault/"
    }
  },
  "max_lease_ttl": "10h",
  "default_lease_ttl": "10h",
  "ui": true
}
Chú thích:
- ui : kích hoạt giao diện quản lý Vault.
- storage : lựa chọn hình thức lưu trữ dữ liệu Vault.
- api_addr : địa chỉ IP cung cấp cách thức access API Vault.
- listener : khai báo port listen cho API Vault và web.
Phân quyền cho thư mục cấu hình Vault.
# chown vault:vault -R /etc/vault/
# chmod 640 /etc/vault/config.json
Khởi động dịch vụ Vault nào.
# chmod 0644 /etc/systemd/system/vault.service
# systemctl daemon-reload
# systemctl enable vault.service
# systemctl start vault.service
Kiểm tra trạng thái dịch vụ Vault .
# systemctl status vault
● vault.service - "HashiCorp Vault - A tool for managing secrets"
   Loaded: loaded (/etc/systemd/system/vault.service; enabled; vendor preset: disabled)
   Active: active (running) since Fri 2019-08-16 09:40:03 UTC; 4min 52s ago
     Docs: https://www.vaultproject.io/docs/
 Main PID: 32760 (vault)
   CGroup: /system.slice/vault.service
           └─32760 /usr/bin/vault server -config=/etc/vault/config.json

Aug 16 09:40:03 ip-10-110-8-80.ap-southeast-1.compute.internal vault[32760]: Api Address: http://0.0.0.0:8200
Aug 16 09:40:03 ip-10-110-8-80.ap-southeast-1.compute.internal vault[32760]: Cgo: disabled
Aug 16 09:40:03 ip-10-110-8-80.ap-southeast-1.compute.internal vault[32760]: Cluster Address: https://0.0.0.0:8201
Aug 16 09:40:03 ip-10-110-8-80.ap-southeast-1.compute.internal vault[32760]: Listener 1: tcp (addr: "0.0.0.0:8200", cluster address: "0.0.0.0:8201", max_request_duration: "1m30s...isabled")
Aug 16 09:40:03 ip-10-110-8-80.ap-southeast-1.compute.internal vault[32760]: Log Level: info
Aug 16 09:40:03 ip-10-110-8-80.ap-southeast-1.compute.internal vault[32760]: Mlock: supported: true, enabled: true
Aug 16 09:40:03 ip-10-110-8-80.ap-southeast-1.compute.internal vault[32760]: Storage: file
Aug 16 09:40:03 ip-10-110-8-80.ap-southeast-1.compute.internal vault[32760]: Version: Vault v1.1.5
Aug 16 09:40:03 ip-10-110-8-80.ap-southeast-1.compute.internal vault[32760]: Version Sha: f08b88029d959e1318746b188fecaad54468230b
Aug 16 09:40:03 ip-10-110-8-80.ap-southeast-1.compute.internal vault[32760]: ==> Vault server started! Log data will stream in below:
Hint: Some lines were ellipsized, use -l to show in full.
2. Cấu hình dịch vụ Vault cơ bản
Khi bạn sử dụng chương trình lệnh ‘vault‘ cli trên Linux, bạn cần export biến môi trường thể hiện thông tin địa chỉ máy chủ Vault . Ví dụ địa chỉ IP Local của máy chủ Vault của mình là “10.110.8.80“.
# export VAULT_ADDR=http://10.110.8.80:8200
# echo "export VAULT_ADDR=http://10.110.8.80:8200" >> ~/.bashrc
Lúc này Vault vẫn đang ở trạng thái chưa khởi tạo hoạt động ban đầu và bị khoá niêm phong (seal). Bạn cần khởi tạo dịch vụ Vault , khi khởi tạo hoàn tất bạn sẽ nhận được tổng cộng 5 chuỗi key dùng để mở niêm phong (seal) dịch vụ Vault và 1 Root Token để login chứng thực sử dụng Vault cơ bản ban đầu. Hãy bảo mật những thông tin này nhé.
# vault operator init | tee -a /etc/vault/init.config
Unseal Key 1: vMqmMhvyuB5j8W8zWpBa9SINNT5hwgmuoUfl6DmLFxBa
Unseal Key 2: WJ+hJf3NCd/9enT+jWqAeBknmKoXyZxwRMA/gb4iiBa+
Unseal Key 3: m+B0VWwZyIskqtLHISdyJxprHTsSS8hkWxPkvtkyxdTx
Unseal Key 4: mJ/BCj7MsNu6z2YM/NmWjLMFPqEPsbMO6llk8PxBJinY
Unseal Key 5: DuXHYneJwbxaGuZWduRxtVtmei0IYFN0bsyJsG2Qciwo

Initial Root Token: s.0iqXakLSHE1e3uhexwUPamF6

Vault initialized with 5 key shares and a key threshold of 3. Please securely
distribute the key shares printed above. When the Vault is re-sealed,
restarted, or stopped, you must supply at least 3 of these keys to unseal it
before it can start servicing requests.

Vault does not store the generated master key. Without at least 3 key to
reconstruct the master key, Vault will remain permanently sealed!

It is possible to generate new unseal keys, provided you have a quorum of
existing unseal keys shares. See "vault operator rekey" for more information.
Giờ bạn cần mở niêm phong dịch vụ Vault ra với ít nhất 3 chuỗi ‘Unseal key‘. Một điều bạn cần lưu ý là khi Vault được mở niêm phong, thì khi nào Vault sẽ quay lại trạng thái bị niêm phong :
- Dịch vụ Vault hoặc máy chủ Vault bị khởi động lại.
- Bị niêm phong bởi API
# vault operator unseal vMqmMhvyuB5j8W8zWpBa9SINNT5hwgmuoUfl6DmLFxBa
# vault operator unseal WJ+hJf3NCd/9enT+jWqAeBknmKoXyZxwRMA/gb4iiBa+
# vault operator unseal m+B0VWwZyIskqtLHISdyJxprHTsSS8hkWxPkvtkyxdTx
Lúc này nếu bạn kiểm tra trạng thái dịch vụ Vault qua cli , thì sẽ thấy dòng trạng thái ‘Sealed‘ đã là ‘false‘, tức đã mở niêm phong.
# vault status
Key             Value
---             -----
Seal Type       shamir
Initialized     true
Sealed          false
Total Shares    5
Threshold       3
Version         1.1.5
Cluster Name    vault-cluster-97148242
Cluster ID      1c3866f1-e593-bc7d-8eb5-f702254d515c
HA Enabled      false
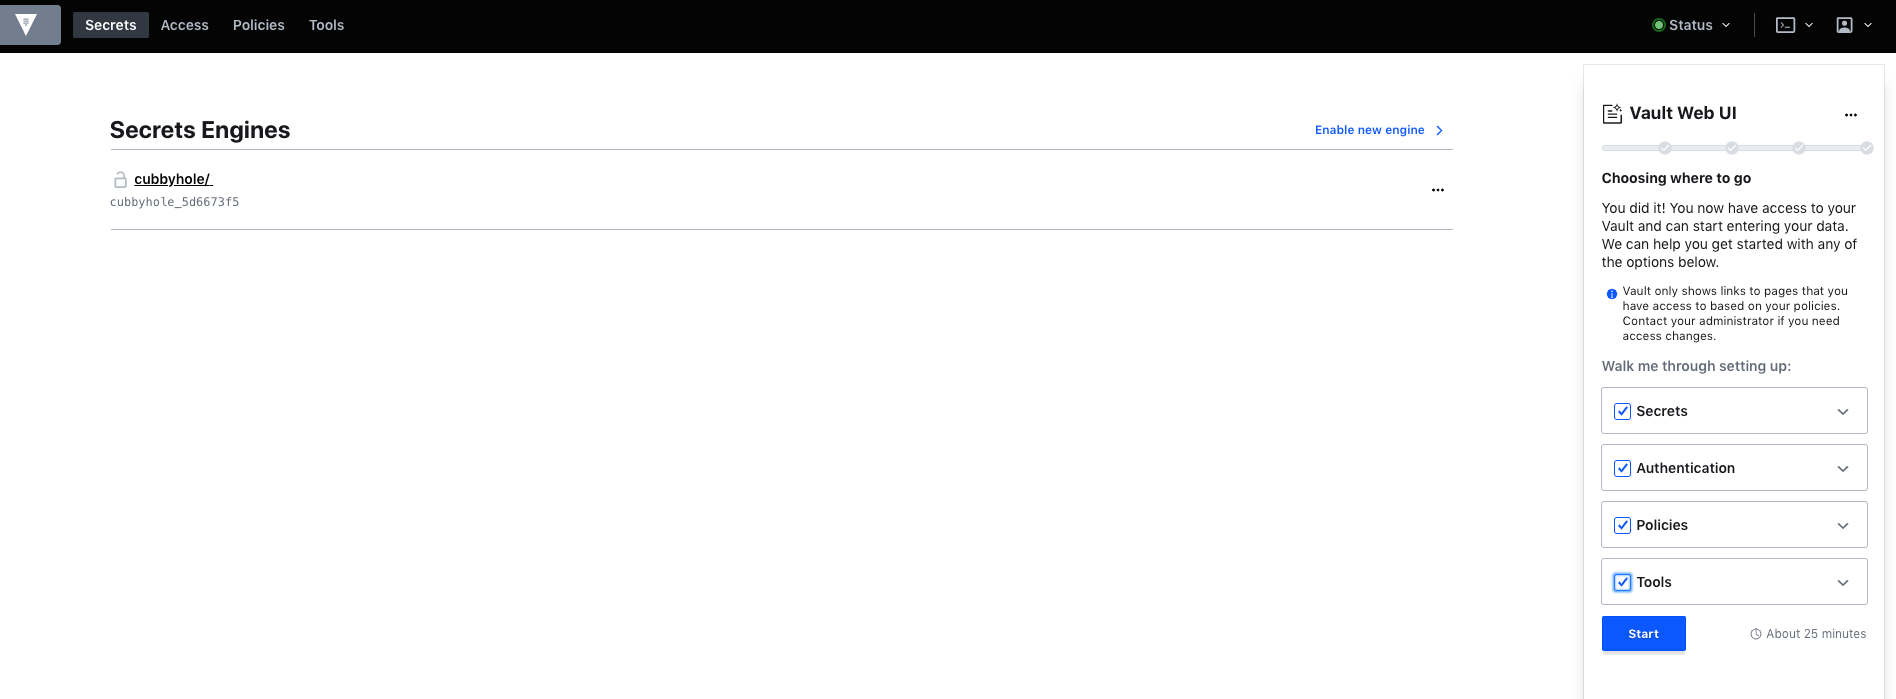
Giờ bạn truy cập giao diện quản lý Vault qua port mặc định 8200 login với chuỗi Root Token lúc khởi tạo Vault nhé.
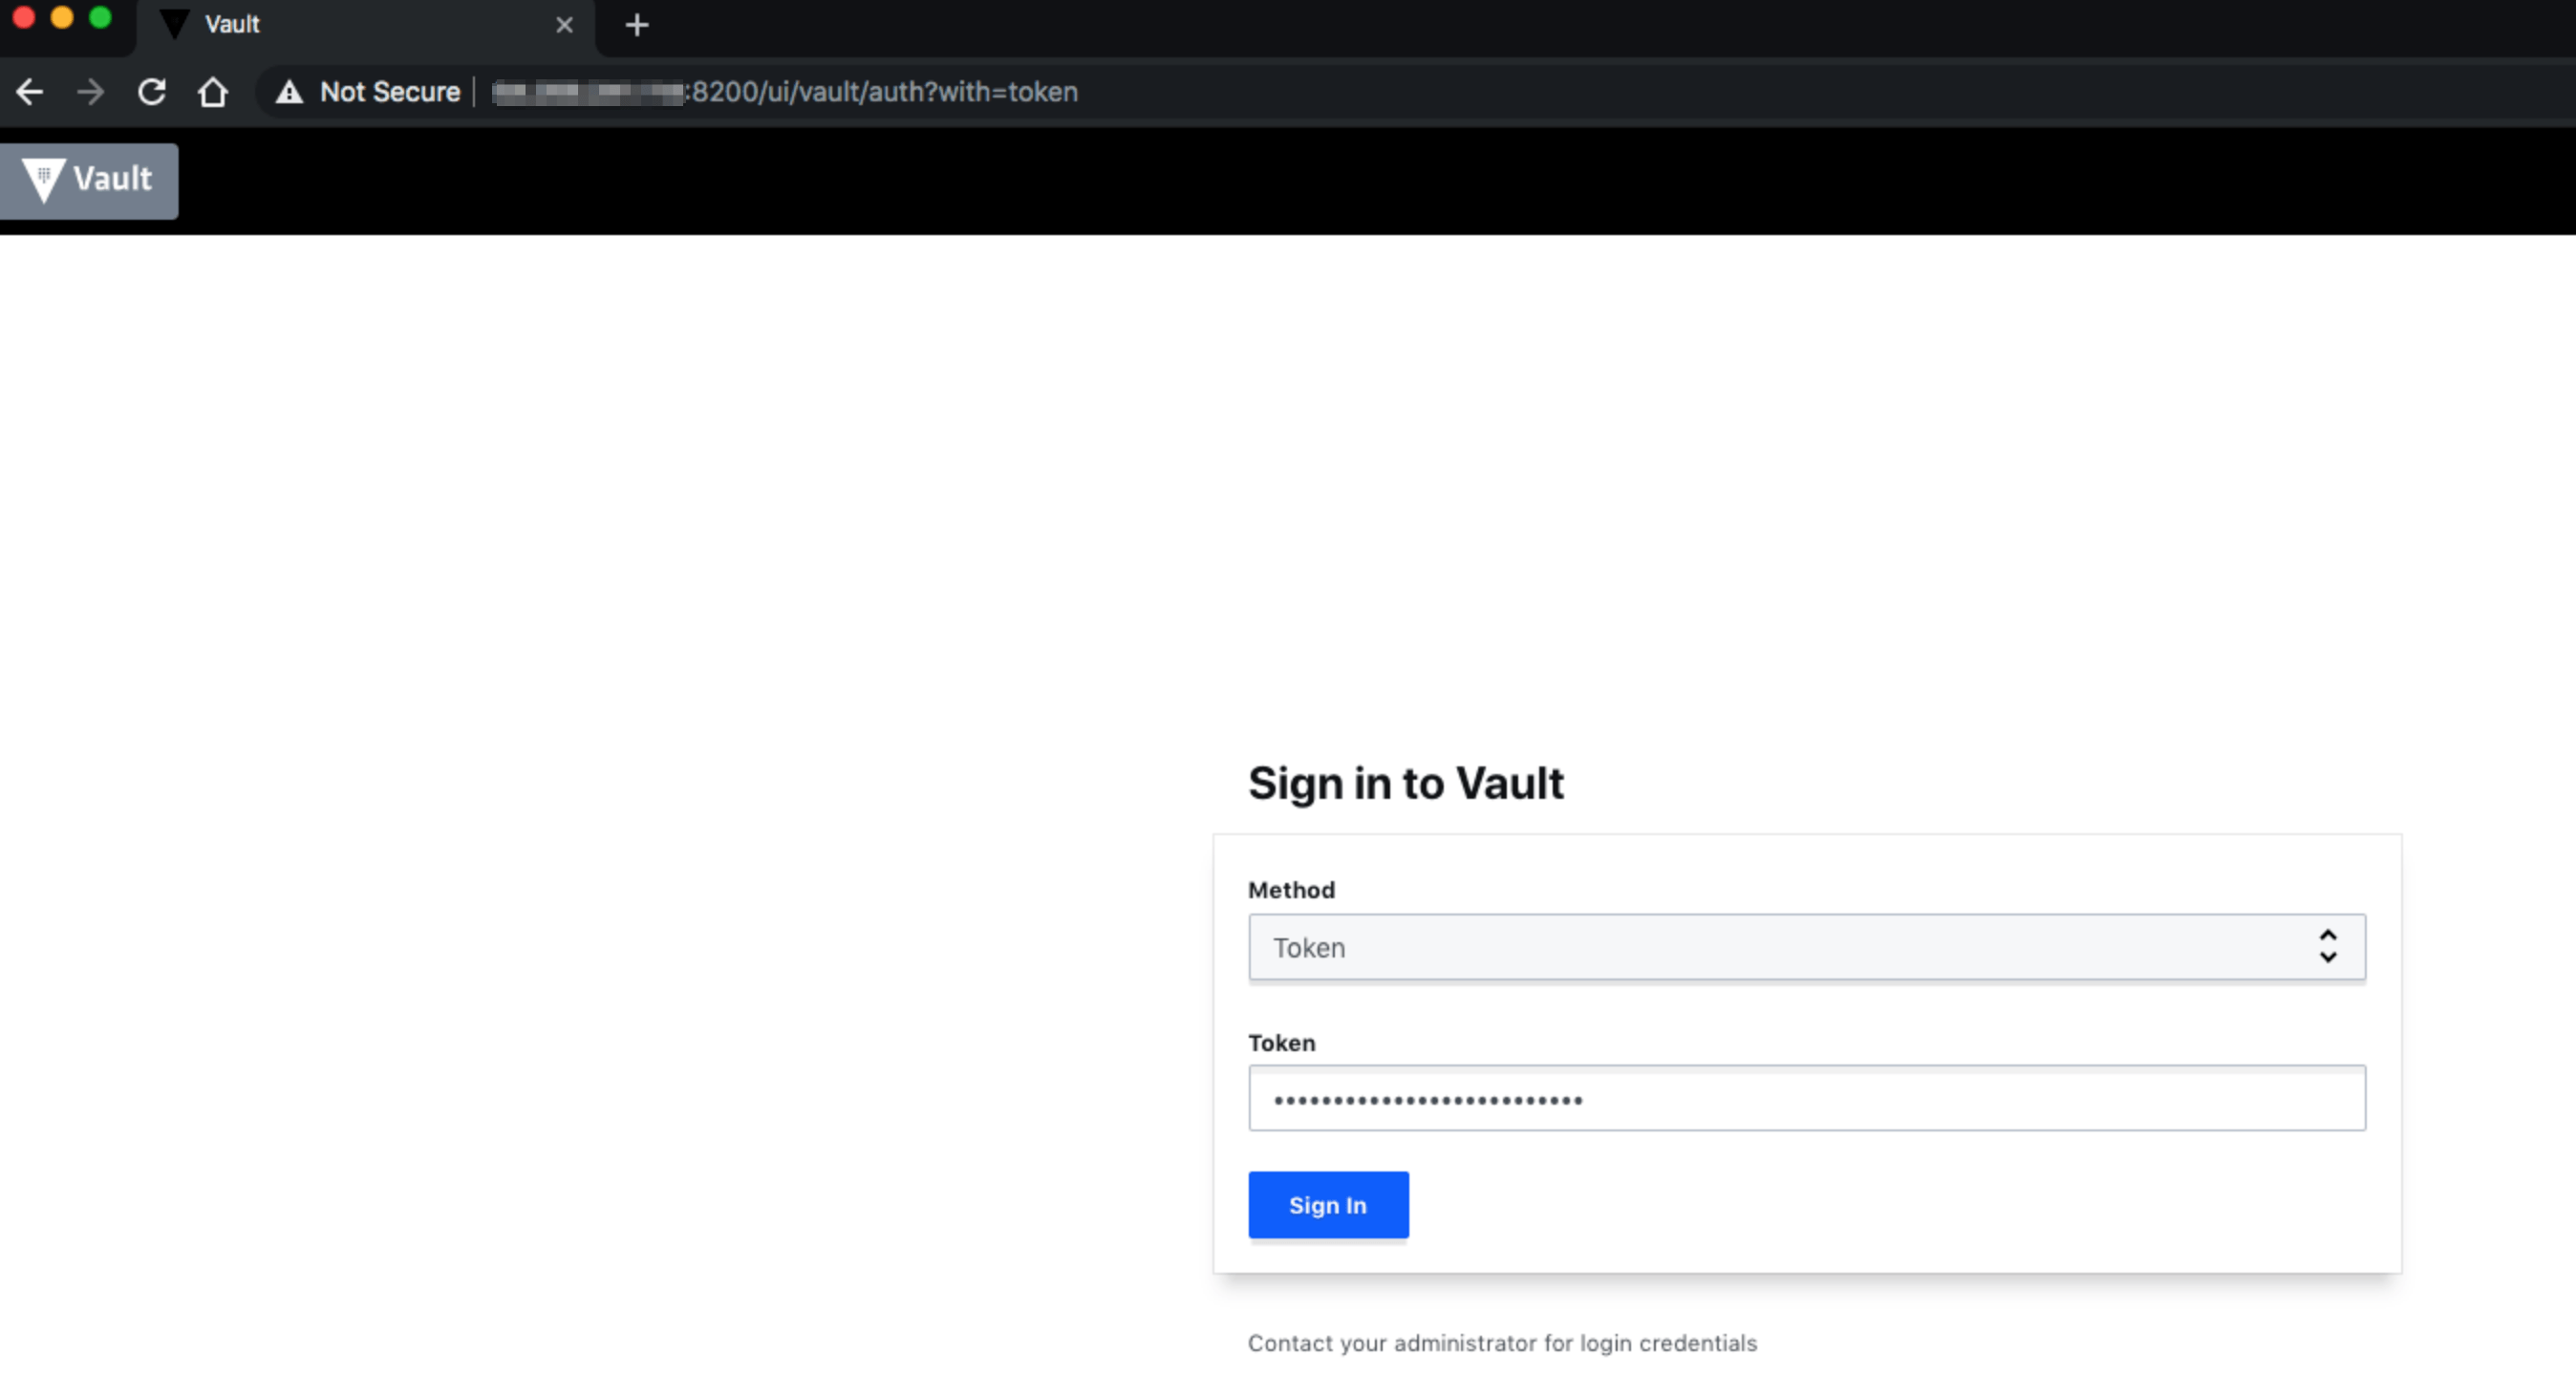
Và đây là giao diện đầu tiên khi truy cập Vault .
Tổng kết
Việc cài đặt dịch vụ Vault cũng không quá phức tạp phải không nào ?! Nhưng mà để làm chủ các tính năng của Vault thì cũng là cả 1 bầu trời trong cả tuần đấy :3 . Chúng ta sẽ sớm làm chủ Vault trong các bài viết kế tiếp nhé.
Nguồn: https://cuongquach.com/

 2001 – Download PDF")

")